Cooking with the Crock-Pot Express

Cooking with the Crock-Pot Express

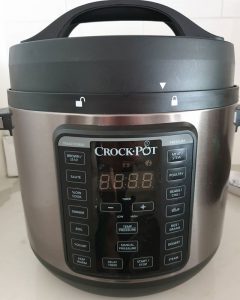
The Crock-Pot Express Multi Cooker is an electric pressure cooker. It uses steam pressure to cook food. Pressure cooking has  been around since the 1600’s, so this machine is electric and newer the concept is the same.

The CPE is also multi-functional, which means it does more than just pressure cook food. This machine can be used in many ways. Sauteing the meat builds flavour into the meal without using a separate pan. There’s a steam setting, soup setting and yogurt setting just to name a few.

I grew up watching my parents use a stove top pressure cooker and it scared the life out of me. If I had to use one of the old ones I would never have tried it for myself. But they have been modernised. They’re easy to use and safe. The CPE is self-regulating and easy to use. It is a learning curve but not a step one – you will gain confidence with experience.I really like the safety features. You can’t take the lid off until it is safe to do so… No matter how hard you try. Having said that, please use any pressure cooker as it is intended as with most kitchen appliances it could be used in an unsafe manner.

We moved house and we were without a stove-top for a few months. I struggled with meals as we usually cook a lot of stir fry’s, omelets, etc. We were using an induction cooker which was good but it was a single burner… Not easy with a family of five, let alone when we had visitors.

Ease and Speed

After reading online a bit I decided upon the Express Crock Multi-Cooker (CPE). I ♥️ this thing! I can pull meat from the freezer at 4.30pm and have a delicious, nutritious meal on the table by 6pm! Usually to do that would involve defrosting meat in the microwave which makes it go tough. However, it isn’t always the quickest option – it isn’t Drive-Thru-Sue speed. The greatest appeal of the pressure cooker for me is the set it- and forget it nature, the hands-off yet delicious yummy factor. Whilst eggs may only take several minutes to hard boil the machine still takes time to come to pressure and then cook so it isn’t always the quickest – but it is one of the easiest, hands-off cooking processes. And for someone like me that is a good thing. I can start cooking eggs, answer the phone then end up folding laundry while the saucepan has turned black and the smoke alarm is screaming. True story. I no longer have burned pots when using the pressure cooker. CPE For the Win!

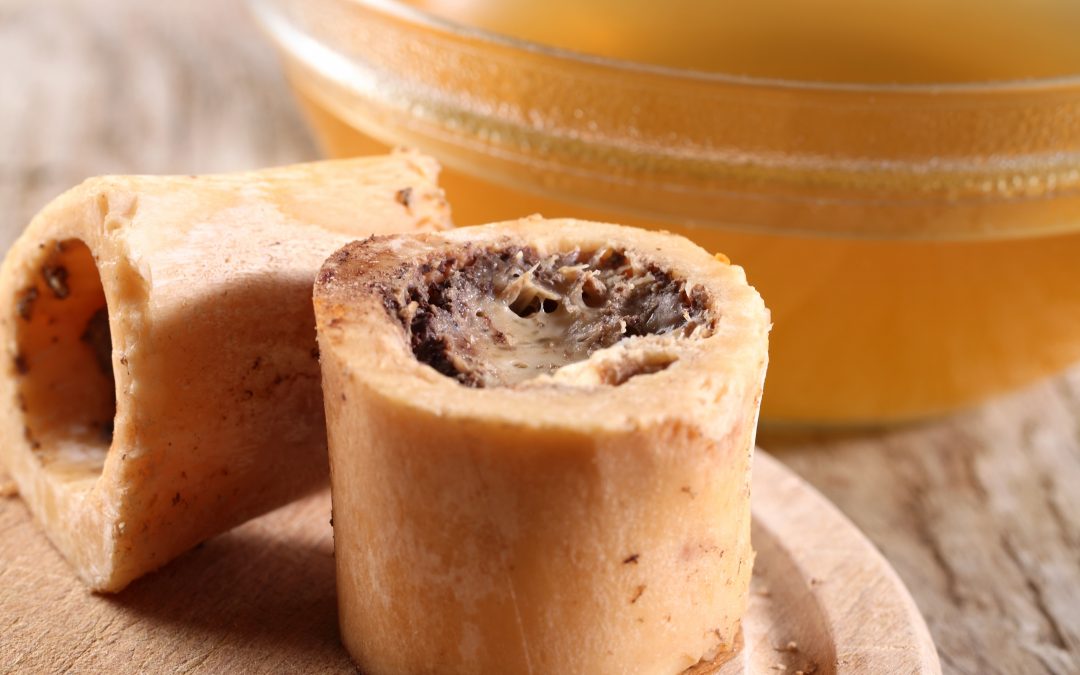
I find the meat is always tender so I can buy cheaper cuts of meat yet they’re still edible! The meals are packed with flavour, which I didn’t always find with the slow cooker. But the best things has to be… Bone broth! Beautiful, rich gelling bone broth from beginning to end in just a free hours. Doesn’t get better than that! What used to take days in the slow cooker now takes a few hours.
CPE For the Win!

It heats and cooks food under pressure, sears and sautés meat, plus steams rice and veggies. It can cook at low temperatures, as a slow cooker but honestly, why would you? It has many features so can cook a variety of meals. The options include Meat/Stew, Beans/Chilli, Rice/Risotto, Poultry, Soup and Steam.

Favourites

Corned Silverside, soups, pasta sauces, spaghetti, Mac n cheese, pulled beef/pork/chicken, bone broth, butter chicken, beef stroganoff and many other casseroles, boiled eggs, cakes and more are some of the dishes I cook in my CPE. Nowadays, I wouldn’t be without my CPE. It really takes the ‘pressure off’. 😂

Considerations

This is not an air fryer. Rather than crispy, crunchy foods think tender and juicy. This is a point not obvious to everyone so it is worth a mention.

The meats and veggies will not be crisp like when roasting in the oven. But they will be tender and full of flavour.

A pressure cooker isn’t going to replace your stove-top or your oven but it will be a marvellous complement to them and a handy addition to your kitchen.

More Information

http://www.crockpot.com.au/

Pressure Cooker Bone Broth

Pressure Cooker Bone Broth

There is more than enough information and recipes on the Internet and books about making a good bone broth so why should I add one more? I’ve put off writing this out as it is so simple and I honestly thought that no one would be interested but I’ve several requests now so thought I’d compile it in the one place – my website.

Jump to Recipe

Easy Bone Broth in the Pressure Cooker

I’ve been doing broth/stock for many years – that’s nothing new. However, I previously used the slow cooker which I did NOT like due to the time and smell. I’ve used stovetop, slow cooker, and pressure cooker (Crock-Pot Express or CPE) but I achieve the best results with the pressure cooker or InstantPot for those in the US.

The batch pictured below was made with grass-fed chicken wings and necks – grass-fed does make a difference. If you can afford it, it’s worth it!

I used my Crock-Pot Express Multi Cooker – cooked on ‘soup’ setting for 2 hours. Add bones (raw or roasted) to the CPE or IP along with 2TB ACV, some herbs and spices. Add some halved carrot, celery and onion. Add bay leaves, herbs – whatever you have in the fridge!

When using the pressure cooker I don’t see the point of soaking the bones in the ACV as the machine takes awhile to heat up before it starts cooking so I count this towards my soaking time.

Cook on high pressure for 2 hours. Natural release, strain and put in fridge. After straining, I add some 1-2 TB of collagen and 1TB gelatin. Not to cheat for the gel rather for the health benefits. That’s it, that’s all I do.

Some general notes on broth straining

For fatty bones, cook the bones ( roast them) to render out any fat first, then make the broth. After making broth, there are a few suggestions for straining off all the fat, which is helpful for fat straining but also if you are particular about what you eat but aren’t able to eat grass-fed/organic. Those suggestions are to:

Chill the broth and skim it. Then warm it just enough that it is pourable. Fill a strainer full of ice. Then pour the broth over the ice. Any remaining fat sticks to the ice and the broth goes under into the container.

Or

Line your pot with cheesecloth. Then simply pull up the cheesecloth, bringing all the bones, etc. with you, leaving broth.

However… I don’t strain using those methods suggested above – but they are great suggestions. I use tongs and a large spoon to get out as much ‘stuff’ as I can and then I pour the liquid though my nut milk bag, which isn’t really a nut milk bag but a paint straining bag that I buy cheaply from the hardware store.

After straining I cool it and then scrape, lift off or remove the fat. If it was organic or grass-fed bones I’ll reuse the fat for cooking otherwise I don’t use it because fat stores toxins. Then I bag it up and freeze it! Done!

Then it can be used in soups, casseroles or wherever broth or stock is used in a recipe. or I drink it daily as a warm drink. I add 3/4 tsp of mineral salt, and ¾ tsp of Trim Bouillon Mix to 1 cup broth. Delicious at any time of the day but especially for breakfast and just before bed.

Pressure Cooker Bone Broth

How to make bone broth in the pressure cooker - quick and easy!
Course Appetizer, Drinks, Soup
Keyword Comfort food

Equipment

  • Pressure Cooker/Instant Pot/ Crock-Pot Multi Express Cooker
  • Nut milk bag or cheesecloth
  • Colander or strainer
  • Tongs

Instructions

Add bones and vegetables

  • Add bones (raw or roasted) to the CPE or IP along with 2TB ACV, some herbs and spices. Add some halved carrot, celery and onion. Add bay leaves, herbs - whatever you have in the fridge!

High pressure for 2 hours. Natural release.

  • Cook on high pressure for 2 hours. Natural release, strain and put in fridge.

Strain and cool.

  • Use tongs and a large spoon to get out as much 'stuff' as possible and then pour the liquid though the cheesecloth.
    After straining, let the broth cool to room temperature or just warmer and then put it in the fridge. It will form a layer of hardened fat on top which is then scraped or lifted off.

Pack and store.

  • Add into glass jars, plastic bags or containers ready for the freezer or fridge.

Notes

Pin It on Pinterest